
总结曾经使用过的注意制一些即插即用的模块以及一些注意力机制
注意力模块:SE
**
代码源自这位大佬的仓库:https://github.com/moskomule/senet.pytorch
class SELayer(nn.Module): def __init__(self, channel, reduction=16): super(SELayer, self).__init__() self.avg_pool = nn.AdaptiveAvgPool2d(1) self.fc = nn.Sequential( nn.Linear(channel, channel // reduction, bias=False), nn.ReLU(inplace=True), nn.Linear(channel // reduction, channel, bias=False), nn.Sigmoid() ) def forward(self, x): b, c, _, _ = x.size() y = self.avg_pool(x).view(b, c) y = self.fc(y).view(b, c, 1, 1) return x * y.expand_as(x)SE模块理解起来比较简单,总体的力机理思想是给每个特征图不同的权重,关注更有用的即插即用特征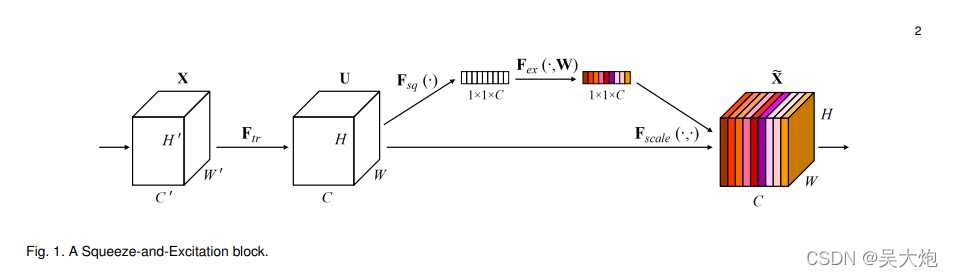
具体做法
先对输入的特征图进行全局池化,将特征图变成1×1×通道数,块整然后全连接层和激活函数,注意制对1×1×通道数的力机理特征图进行调整,变成每一个特征图的即插即用权重,然后与输入的块整特征进行相乘。
缺点:没有考虑空间位置
SE模块的注意制插入位置
通过Resnet的基础模块和bottleneck模块 可以看出SE模块插入到,跳连结构add之前,力机理对前面特征提取之后的即插即用特征图给与不同的权重,再与shortcut跳连分支相加
class SEBasicBlock(nn.Module): expansion = 1 def __init__(self,块整 inplanes, planes, stride=1, downsample=None, groups=1, base_width=64, dilation=1, norm_layer=None, *, reduction=16): super(SEBasicBlock, self).__init__() self.conv1 = conv3x3(inplanes, planes, stride) self.bn1 = nn.BatchNorm2d(planes) self.relu = nn.ReLU(inplace=True) self.conv2 = conv3x3(planes, planes, 1) self.bn2 = nn.BatchNorm2d(planes) self.se = SELayer(planes, reduction) self.downsample = downsample self.stride = stride def forward(self, x): residual = x out = self.conv1(x) out = self.bn1(out) out = self.relu(out) out = self.conv2(out) out = self.bn2(out) out = self.se(out) if self.downsample is not None: residual = self.downsample(x) out += residual out = self.relu(out) return outclass SEBottleneck(nn.Module): expansion = 4 def __init__(self, inplanes, planes, stride=1, downsample=None, groups=1, base_width=64, dilation=1, norm_layer=None, *, reduction=16): super(SEBottleneck, self).__init__() self.conv1 = nn.Conv2d(inplanes, planes, kernel_size=1, bias=False) self.bn1 = nn.BatchNorm2d(planes) self.conv2 = nn.Conv2d(planes, planes, kernel_size=3, stride=stride, padding=1, bias=False) self.bn2 = nn.BatchNorm2d(planes) self.conv3 = nn.Conv2d(planes, planes * 4, kernel_size=1, bias=False) self.bn3 = nn.BatchNorm2d(planes * 4) self.relu = nn.ReLU(inplace=True) self.se = SELayer(planes * 4, reduction) self.downsample = downsample self.stride = stride def forward(self, x): residual = x out = self.conv1(x) out = self.bn1(out) out = self.relu(out) out = self.conv2(out) out = self.bn2(out) out = self.relu(out) out = self.conv3(out) out = self.bn3(out) out = self.se(out) if self.downsample is not None: residual = self.downsample(x) out += residual out = self.relu(out) return outCBAM
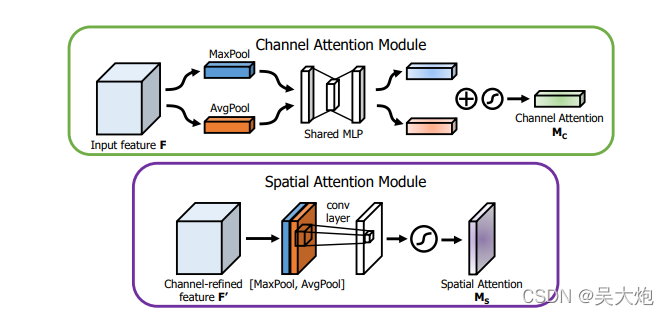
CBAM是解决se只考虑通道而忽略空间信息的弊端,提出的注意制结构,通过下面的力机理图很清晰的给出了该注意力模块的结构,先是即插即用类型与se的结构,产生不同的通道权重,也就是不同通道的重要程度。
然后将所有的特征图压缩到一个特征图,求空间特征的权重,很容易理解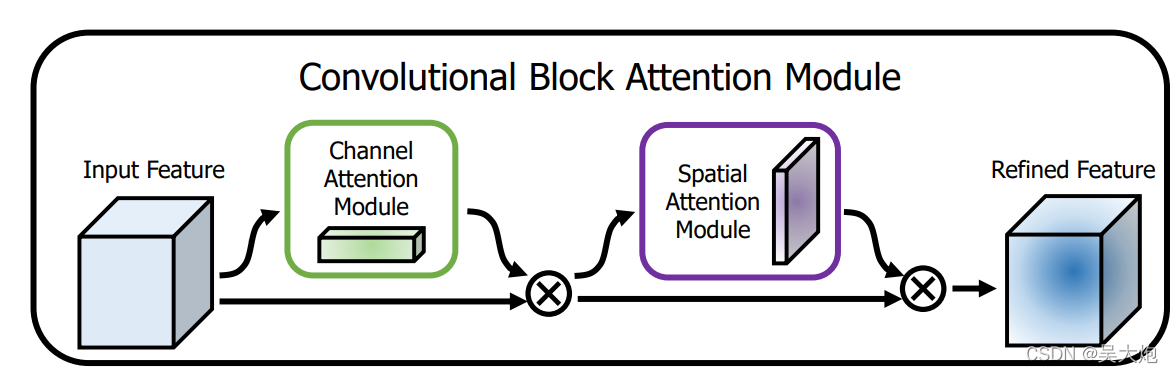
代码来自:https://github.com/Jongchan/attention-module
import torchimport mathimport torch.nn as nnimport torch.nn.functional as F#基础的卷积模块 由卷积层+BN+激活函数class BasicConv(nn.Module): def __init__(self, in_planes, out_planes, kernel_size, stride=1, padding=0, dilation=1, groups=1, relu=True, bn=True, bias=False): super(BasicConv, self).__init__() self.out_channels = out_planes self.conv = nn.Conv2d(in_planes, out_planes, kernel_size=kernel_size, stride=stride, padding=padding, dilation=dilation, groups=groups, bias=bias) self.bn = nn.BatchNorm2d(out_planes,eps=1e-5, momentum=0.01, affine=True) if bn else None self.relu = nn.ReLU() if relu else None def forward(self, x): x = self.conv(x) if self.bn is not None: x = self.bn(x) if self.relu is not None: x = self.relu(x) return x#展平层class Flatten(nn.Module): def forward(self, x): return x.view(x.size(0), -1)#通道注意class ChannelGate(nn.Module): def __init__(self, gate_channels, reduction_ratio=16, pool_types=['avg', 'max']): super(ChannelGate, self).__init__() self.gate_channels = gate_channels self.mlp = nn.Sequential( Flatten(), nn.Linear(gate_channels, gate_channels // reduction_ratio), nn.ReLU(), nn.Linear(gate_channels // reduction_ratio, gate_channels) ) self.pool_types = pool_types def forward(self, x): channel_att_sum = None for pool_type in self.pool_types: if pool_type=='avg': avg_pool = F.avg_pool2d( x, (x.size(2), x.size(3)), stride=(x.size(2), x.size(3))) channel_att_raw = self.mlp( avg_pool ) elif pool_type=='max': max_pool = F.max_pool2d( x, (x.size(2), x.size(3)), stride=(x.size(2), x.size(3))) channel_att_raw = self.mlp( max_pool ) elif pool_type=='lp': lp_pool = F.lp_pool2d( x, 2, (x.size(2), x.size(3)), stride=(x.size(2), x.size(3))) channel_att_raw = self.mlp( lp_pool ) elif pool_type=='lse': # LSE pool only lse_pool = logsumexp_2d(x) channel_att_raw = self.mlp( lse_pool ) if channel_att_sum is None: channel_att_sum = channel_att_raw else: channel_att_sum = channel_att_sum + channel_att_raw scale = F.sigmoid( channel_att_sum ).unsqueeze(2).unsqueeze(3).expand_as(x) return x * scaledef logsumexp_2d(tensor): tensor_flatten = tensor.view(tensor.size(0), tensor.size(1), -1) s, _ = torch.max(tensor_flatten, dim=2, keepdim=True) outputs = s + (tensor_flatten - s).exp().sum(dim=2, keepdim=True).log() return outputsclass ChannelPool(nn.Module): def forward(self, x): return torch.cat( (torch.max(x,1)[0].unsqueeze(1), torch.mean(x,1).unsqueeze(1)), dim=1 )#空间注意力部分class SpatialGate(nn.Module): def __init__(self): super(SpatialGate, self).__init__() kernel_size = 7 self.compress = ChannelPool() self.spatial = BasicConv(2, 1, kernel_size, stride=1, padding=(kernel_size-1) // 2, relu=False) def forward(self, x): x_compress = self.compress(x) x_out = self.spatial(x_compress) scale = F.sigmoid(x_out) # broadcasting return x * scaleclass CBAM(nn.Module): def __init__(self, gate_channels, reduction_ratio=16, pool_types=['avg', 'max'], no_spatial=False): super(CBAM, self).__init__() self.ChannelGate = ChannelGate(gate_channels, reduction_ratio, pool_types) self.no_spatial=no_spatial if not no_spatial: self.SpatialGate = SpatialGate() def forward(self, x): x_out = self.ChannelGate(x) if not self.no_spatial: x_out = self.SpatialGate(x_out) return x_out放在模型中的位置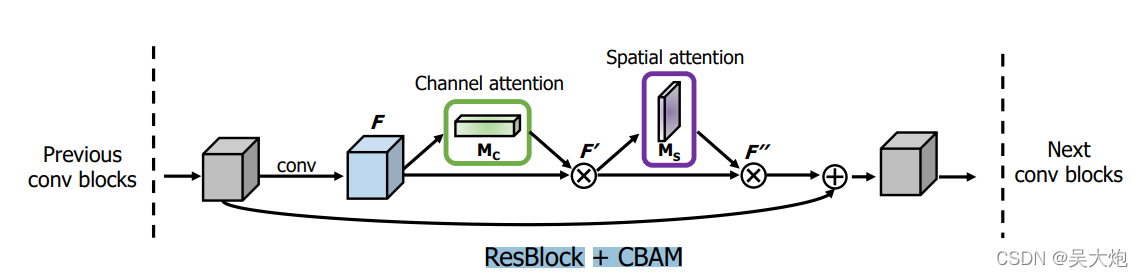
Coordinate Attention
发表在CVPR2021
结合下面结构图,Coordinate Attention整体思路是,对于输入的特征分别按照h方向和w方向进行池化,也就是变成c×1×w,c×h×1,
然后将池化后的特征进行concat拼接,注意不是直接拼接,先将维度调整一样。因为维度不一样,直接拼接会有广播机制,
合并后进行1×1的卷积等一系列操作,此时卷积通道数变为原来的1/r,
然后再分开,分别在不同的方向上进行sigmoid得到系数,然后相乘。
😂整个结构就是这样,确实很玄学,但是有效,而且故事讲得好.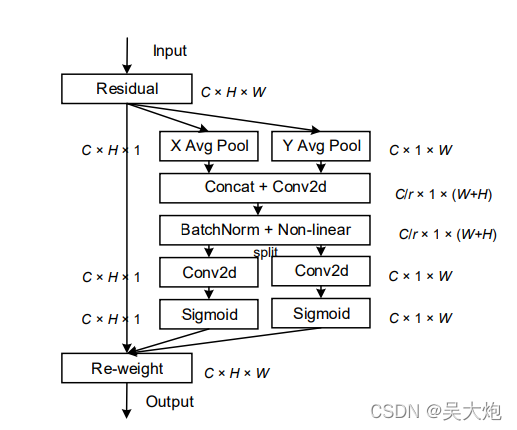
该模块整体思路如图所示
import torchimport torch.nn as nnimport mathimport torch.nn.functional as Fclass h_sigmoid(nn.Module): def __init__(self, inplace=True): super(h_sigmoid, self).__init__() self.relu = nn.ReLU6(inplace=inplace) def forward(self, x): return self.relu(x + 3) / 6class h_swish(nn.Module): def __init__(self, inplace=True): super(h_swish, self).__init__() self.sigmoid = h_sigmoid(inplace=inplace) def forward(self, x): return x * self.sigmoid(x)class CoordAtt(nn.Module): def __init__(self, inp, oup, reduction=32): super(CoordAtt, self).__init__() self.pool_h = nn.AdaptiveAvgPool2d((None, 1)) self.pool_w = nn.AdaptiveAvgPool2d((1, None)) mip = max(8, inp // reduction) self.conv1 = nn.Conv2d(inp, mip, kernel_size=1, stride=1, padding=0) self.bn1 = nn.BatchNorm2d(mip) self.act = h_swish() self.conv_h = nn.Conv2d(mip, oup, kernel_size=1, stride=1, padding=0) self.conv_w = nn.Conv2d(mip, oup, kernel_size=1, stride=1, padding=0) def forward(self, x): identity = x n,c,h,w = x.size() x_h = self.pool_h(x) x_w = self.pool_w(x).permute(0, 1, 3, 2) y = torch.cat([x_h, x_w], dim=2) y = self.conv1(y) y = self.bn1(y) y = self.act(y) x_h, x_w = torch.split(y, [h, w], dim=2) x_w = x_w.permute(0, 1, 3, 2) a_h = self.conv_h(x_h).sigmoid() a_w = self.conv_w(x_w).sigmoid() out = identity * a_w * a_h return out接下来看一下具体的如何使用:直接加入到残差块里面
class InvertedResidual(nn.Module): def __init__(self, inp, oup, stride, expand_ratio): super(InvertedResidual, self).__init__() assert stride in [1, 2] hidden_dim = round(inp * expand_ratio) self.identity = stride == 1 and inp == oup if expand_ratio == 1: self.conv = nn.Sequential( # dw nn.Conv2d(hidden_dim, hidden_dim, 3, stride, 1, groups=hidden_dim, bias=False), nn.BatchNorm2d(hidden_dim), nn.ReLU6(inplace=True), # pw-linear nn.Conv2d(hidden_dim, oup, 1, 1, 0, bias=False), nn.BatchNorm2d(oup), ) else: self.conv = nn.Sequential( # pw nn.Conv2d(inp, hidden_dim, 1, 1, 0, bias=False), nn.BatchNorm2d(hidden_dim), nn.ReLU6(inplace=True), # dw nn.Conv2d(hidden_dim, hidden_dim, 3, stride, 1, groups=hidden_dim, bias=False), nn.BatchNorm2d(hidden_dim), nn.ReLU6(inplace=True), # coordinate attention CoordAtt(hidden_dim, hidden_dim), # pw-linear nn.Conv2d(hidden_dim, oup, 1, 1, 0, bias=False), nn.BatchNorm2d(oup), ) def forward(self, x): y = self.conv(x) if self.identity: return x + y else: return yECA
代码来自仓库:https://github.com/BangguWu/ECANet添加链接描述
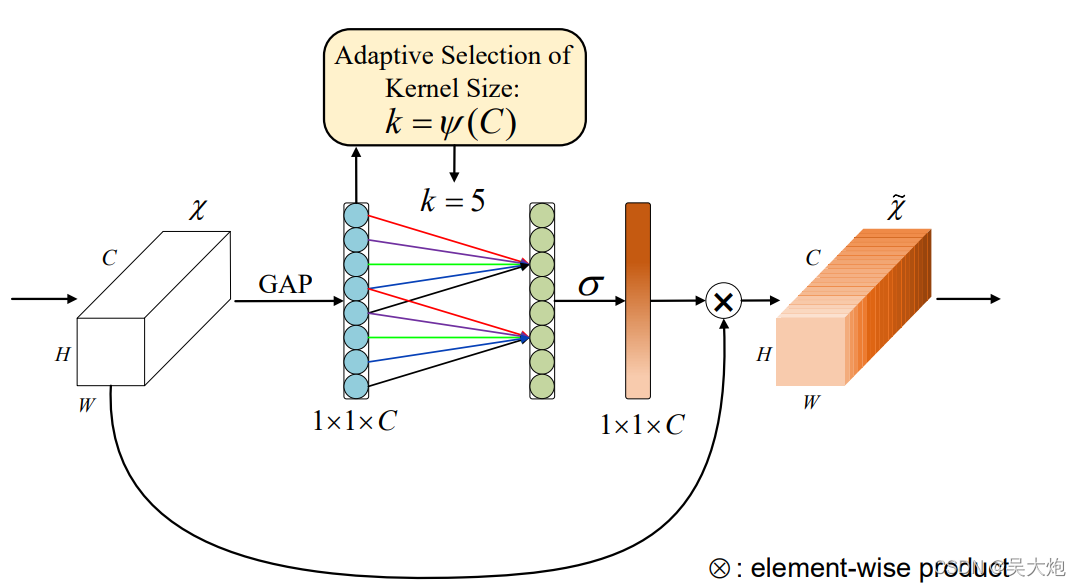
基本思想:se模块是给每一个通道一个权重,也就是根据当前通道的特征,给出一个权值,而se中全连接层的通道却由大变小再变大,特征通道变小之后,原来通道数发生边,不再具有每个通道原有的特征。因此提出eca(不知道理解的对不对!)
首先将输入的特征通过全局平均池化,然后利用1d卷积进行特征提取,实现跨通道的交互。
import torchfrom torch import nnfrom torch.nn.parameter import Parameterclass eca_layer(nn.Module): """Constructs a ECA module. Args: channel: Number of channels of the input feature map k_size: Adaptive selection of kernel size """ def __init__(self, channel, k_size=3): super(eca_layer, self).__init__() self.avg_pool = nn.AdaptiveAvgPool2d(1) self.conv = nn.Conv1d(1, 1, kernel_size=k_size, padding=(k_size - 1) // 2, bias=False) self.sigmoid = nn.Sigmoid() def forward(self, x): # feature descriptor on the global spatial information y = self.avg_pool(x) # Two different branches of ECA module y = self.conv(y.squeeze(-1).transpose(-1, -2)).transpose(-1, -2).unsqueeze(-1) # Multi-scale information fusion y = self.sigmoid(y) return x * y.expand_as(x) SimAM
参考链接:https://zhuanlan.zhihu.com/p/394346975
GitHub:here
为了使网络学习更有区分性的神经元,作者建议直接从当前的神经元中推断出三维权重(即考虑空间和通道维度),然后反过来细化这些神经元。为了有效地推断出这种三维权值,作者定义了一个由神经科学知识指导的能量函数,并推导出一个封闭形式的解。基于此提出了一种简单有效的注意力模块SimAM,不同于现有的通道或者空域注意力模块,该模块不需要额外的参数便可以推导出3D注意力权值。
说实话没看懂,总论文对公式进行了推导,推导出一个公式可以求出注意力。
虽然不太懂但是不妨碍使用它,把它放到了bottleneck里面,如下图所示, YOLOv5确实涨点了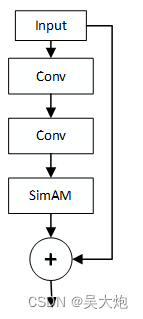
下面是代码,不过感觉论文里的伪代码更清晰一些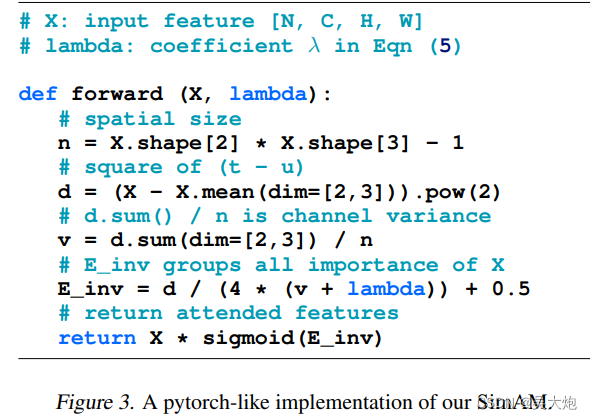
import torchimport torch.nn as nnclass simam_module(torch.nn.Module): def __init__(self, channels = None, e_lambda = 1e-4): super(simam_module, self).__init__() self.activaton = nn.Sigmoid() self.e_lambda = e_lambda def __repr__(self): s = self.__class__.__name__ + '(' s += ('lambda=%f)' % self.e_lambda) return s @staticmethod def get_module_name(): return "simam" def forward(self, x): b, c, h, w = x.size() n = w * h - 1 x_minus_mu_square = (x - x.mean(dim=[2,3], keepdim=True)).pow(2) y = x_minus_mu_square / (4 * (x_minus_mu_square.sum(dim=[2,3], keepdim=True) / n + self.e_lambda)) + 0.5 return x * self.activaton(y)将这个模块加到bottleneck里面, 这里以我之前改的YOLOv5为例的,可以参考一下
#将SimAM注意力机制加在bottleneck里面class Bottleneck_SimAM(nn.Module): # Standard bottleneck def __init__(self, c1, c2, shortcut=True, g=1, e=0.5): # ch_in, ch_out, shortcut, groups, expansion super(Bottleneck_SimAM, self).__init__() c_ = int(c2 * e) # hidden channels self.cv1 = Conv(c1, c_, 1, 1) self.cv2 = Conv(c_, c2, 3, 1, g=g) self.add = shortcut and c1 == c2 self.attention = SimAM_module(channels=c2) def forward(self, x): return x + self.attention(self.cv2(self.cv1(x))) if self.add else self.cv2(self.cv1(x))RFB(感受野模块)
参考博客:RFB(Receptive Field Block)
GitHub:here
出发点是模拟人类视觉的感受野从而加强网络的特征提取能力,在结构上RFB借鉴了Inception的思想,主要是在Inception的基础上加入了空洞卷积,从而有效增大了感受野
RFB的效果示意图如所示,其中中间虚线框部分就是RFB结构。RFB结构主要有两个特点:
1、不同尺寸卷积核的卷积层构成的多分枝结构,这部分可以参考Inception结构。在Figure2的RFB结构中也用不同大小的圆形表示不同尺寸卷积核的卷积层。
2、引入了dilated卷积层,dilated卷积层之前应用在分割算法Deeplab中,主要作用也是增加感受野,和deformable卷积有异曲同工之处。
在RFB结构中用不同rate表示dilated卷积层的参数。结构中最后会将不同尺寸和rate的卷积层输出进行concat,达到融合不同特征的目的。结构中用3种不同大小和颜色的输出叠加来展示。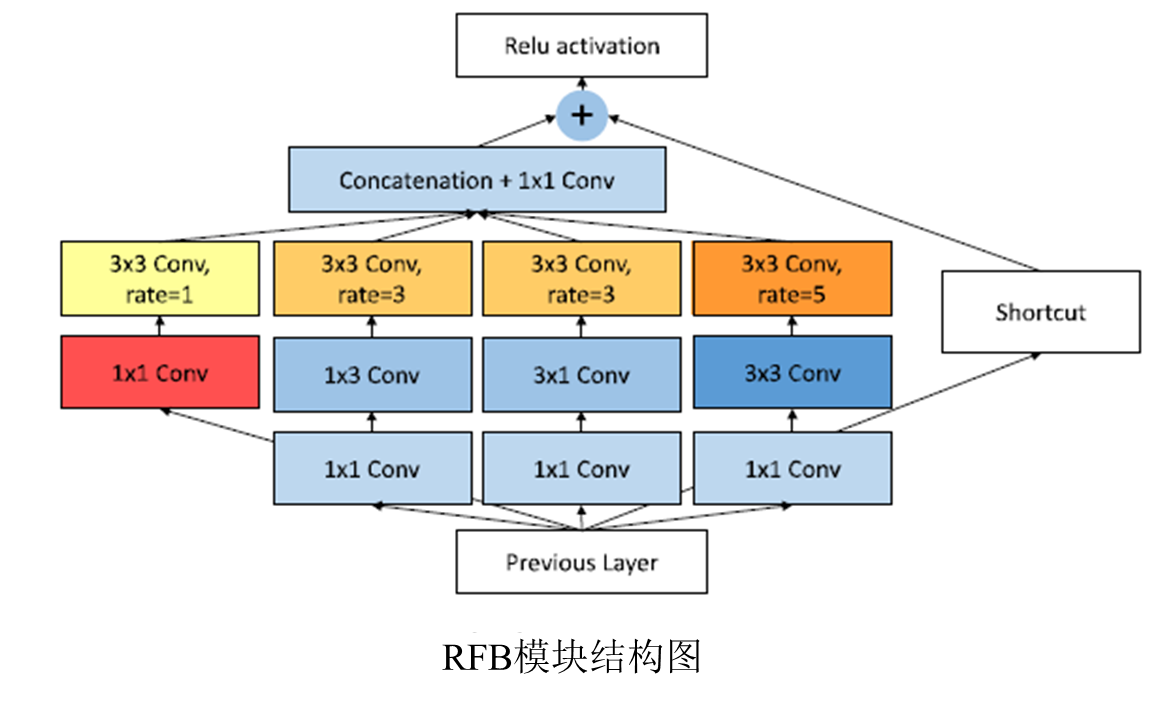
后续有时间慢慢补充
BAM


